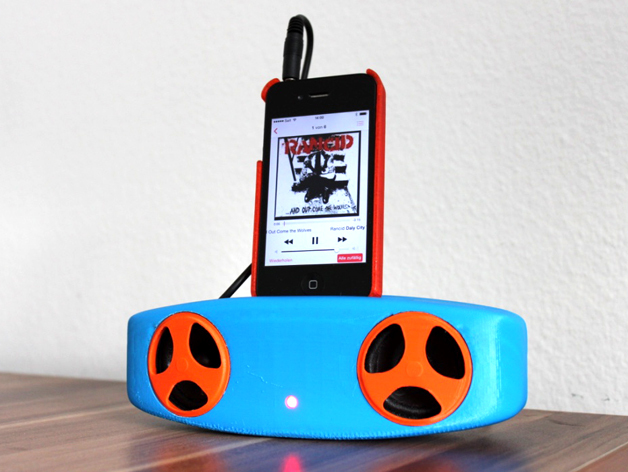
3D model download
Smartphone mp3 speaker free 3d print model download
This model ?Smartphone/mp3 Speaker? is built with Autodesk Fusion 360. Print this model to enjoy, or get inspired to create and print your own speakers!This project is previewed as ?starter/advanced lessons? for classes with children form 12 to 16 years or eve
- Model code
- 2837
5.00 USD
ABOUT THIS MODEL
Description & specifications
This model ?Smartphone/mp3 Speaker? is built with Autodesk Fusion 360. Print this model to enjoy, or get inspired to create and print your own speakers!This project is previewed as ?starter/advanced lessons? for classes with children form 12 to 16 years or even older.Read on to understand the object and the structure of the project.Print SettingsPrinter Brand:MakerBotPrinter:MakerBot Replicator 2Rafts:YesSupports:YesResolution:0.1Infill:10-15%Notes:It?s probably a bit tricky to place the parts.. Check out the pictures.. I often used a 45? angle. The file ?Hebel_fixed? you should print on top without support. How I Designed ThisIn this section I?ll tell you about how I designed the 3D model. In the next section I?ll suggest an outline for a classroom project where students create their own speakers.The 3D models of this project were made in Autodesk Fusion 360. There?s a teacher and students version of the software that runs on Mac and Windows. It?s quite easy to learn. They offer even an understandable introduction and some sample constructions.First you or your students have to measure and design the electronical components (?> step-file). These define the size/volume needed and can be used as subtractive parts (e.g. to create the holes needed). Thereafter they can start to design the housing.Attention: Depending on the 3d-printer you?re using, you need to add tolerances between 0.2 and 0.5 mm for intermateable or movable parts.Project: Design your own speakerObjectives Design and create 3D printed joints from scratch. Build ?real things? (speaker) from simple component pieces. Learn basic 3D design skills and how to use Autodesk Fusion 360 or 123d Design. Learn soft-soldering and to populate circuit boards. Explore simple ELV circuits, ELV components and their functions or product design (depending on classroom usage).Audiences Anyone from 12 years on that is new to 3D modeling can use this project to get started with Autodesk Fusion 360 or 123d Design. Students can use this project as a jumping-off point for constructing models of their own ?speakers? or to develop their own home media gadgets.Preparation Students will need access to computers with the Autodesk software installed. The software is easier to use with a mouse than with a tablet or trackpad, so computer mice are recommended. No previous 3D design experience is required for the students, although familiarity with Autodesk would be helpful. The instructor should be comfortable answering modeling questions about Autodesk and be able to advise students to avoid design features that might cause printing difficulties (overhangs, delicate features, etc). Use some USB-Sticks to save the students work. It?s easy and fast to use and you got all files bundled and mobile. You?ll need one or more 3D printers and some useful tools like pliers, files, sandpaper, etc. Before you start designing the elecronic parts should be developed and clear.Material needed 1x 5mm diameter standard LED 1x DC socket 5,5/2.1mm (DC 13A) 1x 20mm rocker switch (e.g. Arcolectric 1091-1133ND) 1x mini stereo plug 3.5mm 1x 5x10mm spring (from a damaged pen) electric wires 2x speakers (ramsonic LMP-5016-B60) resistors: 330, 220, 22, 1 Ohm 2x capacitor 0.1uF 1x elko 470uF 1x elko 4.7uF 1x elko 1000uF 1x IC TDA 2003 1x board 4x 3 x 10mm woodscrew 6x 3 x 20mm woodscrew 1x perforated metal plate 30x30mm 1x M3x5 nut and bolt 4x M3x5 bolt and square nuts 1x powersupply DC 9V/400mA up to 12V 1500mATools needed Measuring instruments Soldering iron Solder Side cutter Cable stripper Screwdrivers Glue Pliers Other tools to work save and to make some finish.(That?s probably not a 100% correct, but I tried to make it simple and clear for everyone..) StructureIntroduction This project can easily be used in conjunction with other parts of your curriculum. In this section I would like to suggest an outline for a few different ways of implemantation:Simple circuits For students without any knowlegde about electronics I would recommend to make something like a ?simple circuit ? experiment workshop? (?Werkstattunterricht/Atelier?). Using very simple elements (lamps, wires, bimetal, etc.) they learn basics like the function of resistors, fuses, serial-/parallel connection, switches etc.ELV components and their functions After that you can start to make smaller projects like ?running lights?, ?blinker?, ?metronom?, etc. to learn the functions of capacitors and other components. Right here it?s may time to introduce soldering and populate circuit boards. With younger students or beginners in CAD you could (first) make a flashlight instead of speakers. It?s less complex but ends up in a great result too. (the flashlight-lesson is under construction..)Product design It?s even interesting to set a focus on design. The students can make a research of exsisting designs, compare them, evolve categories, pros and cons.. The students should analyse them by usage and feasability. After that they should create a remake, remix or modification. Let make them ?hand sketches? to find there own forms. This creates a different understanding in the developpement process (fast and sensitive) and a deeper ?hands on? forms then to start directly in the CAD. A special field of interest could also be the assembly and disassembly: joints, steps, etc.ResultsAt the end of this project, each student should at least have: An initial sketch of its speaker A CAD-model and -file in Autodesk Fusion 360 or 123d Design *.stl-files to print the objects All the 3D printed pieces A functional self-made amplifier A ?real? and functional speakerFurther ActivitiesProjects The students should develope/calculate their own amplifier. The students should research objects of their interest and analyse them by usability and feasability. After that they should create a remake, remix or modification. This can go quiet far: bluetooth, usb connections or chargers?Basic ideas of the projectIdeasWell, the basic idea behind this project is to engage young people to get in touch with the game changing tools and to start thinkering and engineering in school. That?s why I decided to chose a subject of their world and interests. The asset of this project is to create not merely a model of something, but rather a real thing. It represents a ?real world? conjunction of low- and high-tech materials, wich demands an ajustment of solutions, what assists knowledge reconstruction and problem-solving skills. And, as I tried to explain under ?Structure?, this project provides even a meaningful context for understanding abstract concepts (physics, math, engineering, design..). And at least it could be a jumping-off point for critical design and environment analysis by students and to actively remake, make and invent things ? as responsible personalities ? to make things better.InspirationThis project was one of the key reasons to search new possibilities of fabrication in school and finally to buy a 3d-printer. I made this project with my students a serval times: with wood, acrylics and other conventional materials. Students had always great ideas of design, but it was nearly impossible to realize these with those materials ? or it would have taken too much time. With the 3d-printer they can (nearly) realize every form much quicker. As consequence they now have even time to iterate ? to reflect and to improve their work. This increases the quality of the products, what?s good for the motivation and they indeed learn problem solving skills as ?real-world? and iterative process.And 3d-printing is even comparable with techniques we used before to create ?free forms? like ?layered construction? with wood. Above are some examples with conventional materials made by students (13 years old).Credits:MakerBoter Rate this 3D modelDownload 3D modelsFileFile size smartphone_mp3_speaker7 MB