3D model download
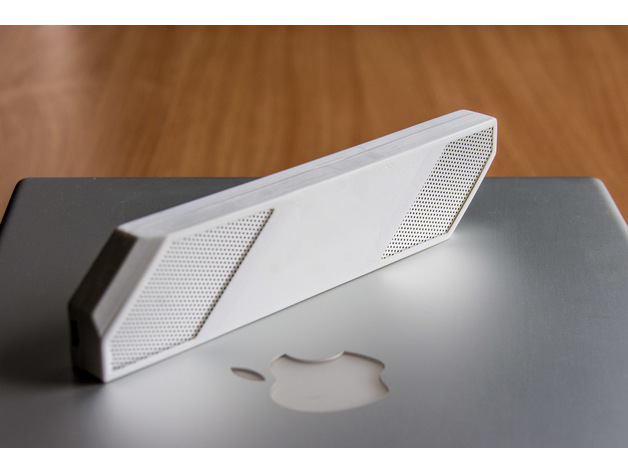
Battery powered bluetooth speaker free 3d print model download
After my 2007 MacBook Pro finally died ? I decided to recycle some of its parts. The sound quality of its tiny speakers was always quite good, so I made this battery powered bluetooth speaker from them. It is small enough to easily fit into your laptop bag and
- Model code
- 3002
5.00 USD
ABOUT THIS MODEL
Description & specifications
After my 2007 MacBook Pro finally died ? I decided to recycle some of its parts. The sound quality of its tiny speakers was always quite good, so I made this battery powered bluetooth speaker from them. It is small enough to easily fit into your laptop bag and runs for many hours of the 1200 mAh battery. The speaker grills are cut from the MacBooks original ones.Happy making. Versions v1.0: Initial post. v1.2: Stiffened housing, optimised grill recess. v1.3: Optimised lip ?seal?. Added printable grill.Parts ListThe additional parts needed can be easily sourced online. Although the bluetooth amp is rated for 5V it runs without a problem of the 3.7V lipo battery. 1x set of speakers from MacBook Pro model number A1226, A1211 or A1260. 2x 3W Bluetooth amplifier module TE657 This module is sold under many different names. Compare pictures when in doubt. ebay.de banggood.com google Lipo charger module TE585 a.k.a TP4056 ebay.de banggood.com gearbest.com google Lipo battery 1200 mAh ca. 53 x 30 x 10 mm ebay.de banggood.com gearbest.com google Mini sliding switch ca. 19.5 x 5.5 x 5mm Two short M3 screws Ideally two terminals from a 2.54mm 90? header Micro USB power supply for chargingIf you find a good source for the components not listed here leave it in the comments. PrintingThe shell is optimised for printing with a 0.4mm nozzle at 0.2 mm layer height. No support is required even the top part with a maximum overhang of 45? prints fine without support.The printable grill is easier to make than you might think. I deactivated retracts and overextruded about 10%. Assembly Prepare the speakersRemove the mounting tabs and the microphone section from the speakers. In general be careful not to cut into the soundbox of the speaker. Check the last picture that shows the cuts to make. Prepare the grillsThe grills can be cut by scoring them with a X-Acto knife and breaking them over a sharp (table) edge. Then use a file to fit them into the recess in the top part of the housing. Remove the black textile backing from them to significantly improve the sound quality. Electrical connectionsWe need to make the following connections The black wire of the battery to the ?Bat -? Terminal of the charger module. The red wire of the battery to the ?Bat +? Terminal of the charger module. The ?Bat -? Terminal of the lipo charger module to the GND terminal on the bluetooth module. The ?Bat +? Terminal of the lipo charger module to one terminal of the sliding switch. From the sliding switch to the +5V terminal of the bluetooth module. The speakers to the output of the bluetooth module.Additional TipsYou could solder the battery directly to the charger module. A better solution is to use two 90? 2.54mm header Contents Summary Parts List Printing AssemblyTip Designer Report Thing Tags apple audio battery bluetooth clamshell Lipo macbook recycling speaker Design Tools Fusion 360 License Battery powered bluetooth speaker by mmone is licensed under the Creative Commons ? Attribution ? Share Alike license. Use This Project Remix This Give a Shout OutIf you print this Thing and display it in public proudly give attribution by printing and displaying this tag. Print Thing Tag Thing Statistics 2293Views 24Downloads Found in Audio SummaryAfter my 2007 MacBook Pro finally died ? I decided to recycle some of its parts. The sound quality of its tiny speakers was always quite good, so I made this battery powered bluetooth speaker from them. It is small enough to easily fit into your laptop bag and runs for many hours of the 1200 mAh battery. The speaker grills are cut from the MacBooks original ones.Happy making. Versions v1.0: Initial post. v1.2: Stiffened housing, optimised grill recess. v1.3: Optimised lip ?seal?. Added printable grill.Parts ListThe additional parts needed can be easily sourced online. Although the bluetooth amp is rated for 5V it runs without a problem of the 3.7V lipo battery. 1x set of speakers from MacBook Pro model number A1226, A1211 or A1260. 2x 3W Bluetooth amplifier module TE657 This module is sold under many different names. Compare pictures when in doubt. ebay.de / banggood.com / google Lipo charger module TE585 a.k.a TP4056 ebay.de / banggood.com / gearbest.com / google Lipo battery 1200 mAh ca. 53 x 30 x 10 mm ebay.de / banggood.com (1000mAh) / gearbest.com / google Mini sliding switch ca. 19.5 x 5.5 x 5mm Two short M3 screws Ideally two terminals from a 2.54mm 90? header Micro USB power supply for chargingIf you find a good source for the components not listed here leave it in the comments. PrintingThe shell is optimised for printing with a 0.4mm nozzle at 0.2 mm layer height. No support is required even the top part with a maximum overhang of 45? prints fine without support.The printable grill is easier to make than you might think. I deactivated retracts and overextruded about 10%. Assembly Prepare the speakersRemove the mounting tabs and the microphone section from the speakers. In general be careful not to cut into the soundbox of the speaker. Check the last picture that shows the cuts to make. Prepare the grillsThe grills can be cut by scoring them with a X-Acto knife and breaking them over a sharp (table) edge. Then use a file to fit them into the recess in the top part of the housing. Remove the black textile backing from them to significantly improve the sound quality. Electrical connectionsWe need to make the following connections The black wire of the battery to the ?Bat -? Terminal of the charger module. The red wire of the battery to the ?Bat +? Terminal of the charger module. The ?Bat -? Terminal of the lipo charger module to the GND terminal on the bluetooth module. The ?Bat +? Terminal of the lipo charger module to one terminal of the sliding switch. From the sliding switch to the +5V terminal of the bluetooth module. The speakers to the output of the bluetooth module.Additional TipsYou could solder the battery directly to the charger module. A better solution is to use two 90? 2.54mm header terminals and solder them to the charger. I used the terminals without the plastic part and shorted them a little to maintain a low profile. That way we make sure the module still fits in below the left speaker. Then you remove the two 2.54mm crimped contacts from battery plug housing and plug them onto the header contacts without soldering. Remove them one by one from the housing making sure to isolate them with heat shrink tube or tape right away. The cables to bluetooth module/switch can be soldered directly to the charging module.Whatever solution you use make sure to never short the two battery contacts. In the best case you will damage the battery in the worst you?ll create a little fire.Same as for the battery the crimped contacts of the speakers can be reused by removing them from the plug housing. The cable for the right speaker needs to be shortened though. Mounting the partsThe charger module and the switch can be either glued or ?heat-stacked? into the housing. Speakers and the battery can be fixed with some double sided tape but that is not strictly necessary. The grills are glued in. I used hot glue for that. Finally you can wrap a piece of black tape around the light pipe that leads to the status LED on the bluetooth module, this reduces light bleeding into the surrounding housing. The housing itself holds together well when the two halves are pushed together just through friction.Credits:mmone Rate this 3D modelDownload 3D modelsFileFile size Battery_powered_bluetooth_speaker2 MB
Battery powered bluetooth speaker free 3d print model download